Triggers
Triggers enable you to run automations in four different ways. You can assign as many triggers as you like to an automation and have more than one of each type.
Trigger types
Workflows initiated by triggers mention Operations Manager in the job description.
Create and edit triggers
Open the Create Trigger panel
Click the Create Trigger button (+) in the Triggers toolbar on the Automation Details page. The Create Trigger panel appears on the left.
You can edit existing triggers from the trigger card by clicking the trigger name at the top of a card.
Create API triggers
API endpoint triggers run the automation whenever the configured endpoint receives an HTTP POST request. When a request is received:
The body of the HTTP POST request (represented as a JSON object) is validated against the POST body schema defined in the trigger.
To use keys and values from the body of the HTTP POST request in a workflow, you must reference them as job variables in the workflow.
Each API trigger requires a unique route name. Endpoint trigger URLs use the following format:
The Create API Endpoint Trigger panel includes the following fields:
- Name: Enter or edit the trigger name.
- Description (optional): Enter a brief description of the trigger.
- Type: Select the trigger type.
- Action: The HTTP method is always
POST. - Route (required): Enter the unique route name for the endpoint.
- JST (optional): Select the JST to transform the
HTTP POSTrequest body to the input schema of the assigned workflow. - POST Body Schema: The JSON schema the
HTTP POSTrequest body must match. - Save Changes: Save the trigger.
POST body schema
The POST body schema is a JSON schema against which the body of the HTTP POST request is validated. If the request body is valid, the API trigger proceeds to run the automation. If the request body is invalid, the automation does not run.
The POST body schema uses the following syntax:
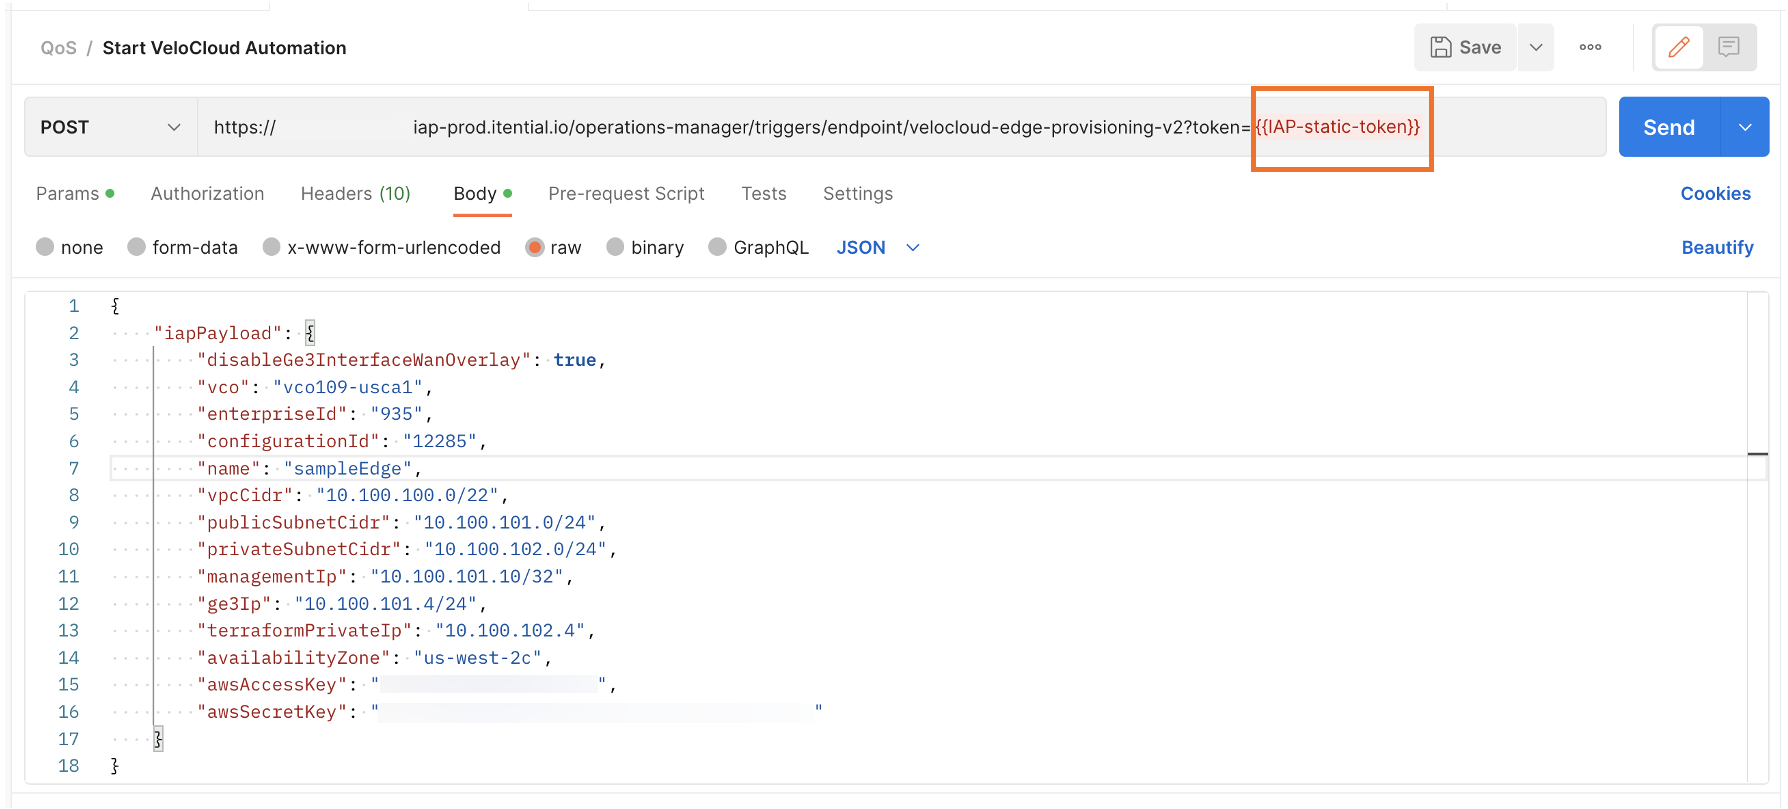
Example: Velocloud Edge Provisioning automation
The following example shows how to trigger a Velocloud Edge Provisioning automation using an API endpoint trigger.
Create the API endpoint trigger
Endpoint: Use the following endpoint to trigger the automation:
Authentication: Itential Platform uses a token for API calls, passed to the endpoint via the token query parameter. In on-premises environments, retrieve this token by calling the login endpoint. See the API documentation for reference. For SaaS customers with Itential Cloud environments, the token is provided by the Product Support Team.
Payload body: The values in the payload body are used by the automation for edge provisioning in Velocloud:
Postman call: An example of the API call in Postman:
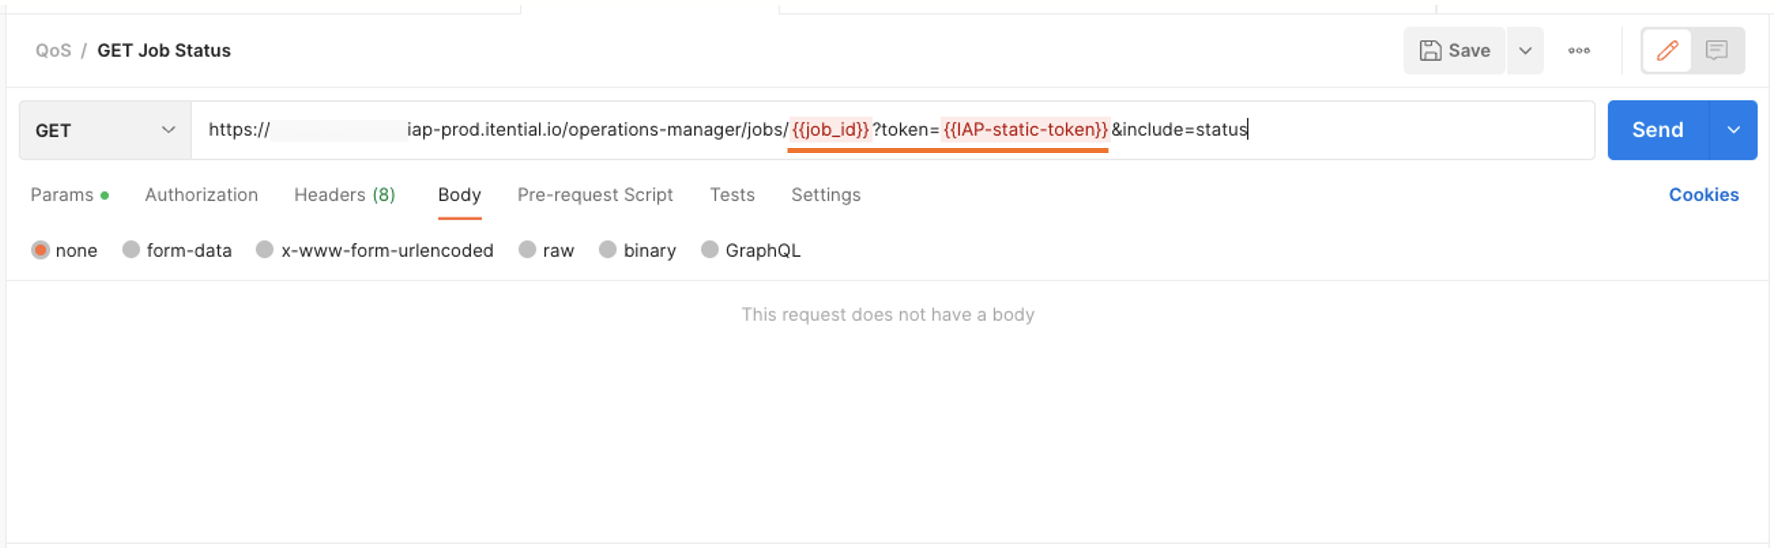
Check automation status
To check the status of the automation (job), make a separate call to Itential Platform. When triggering automations via API, Itential Platform returns a 200 status code if the automation started successfully.
GET call: Use the following URL to check job status:
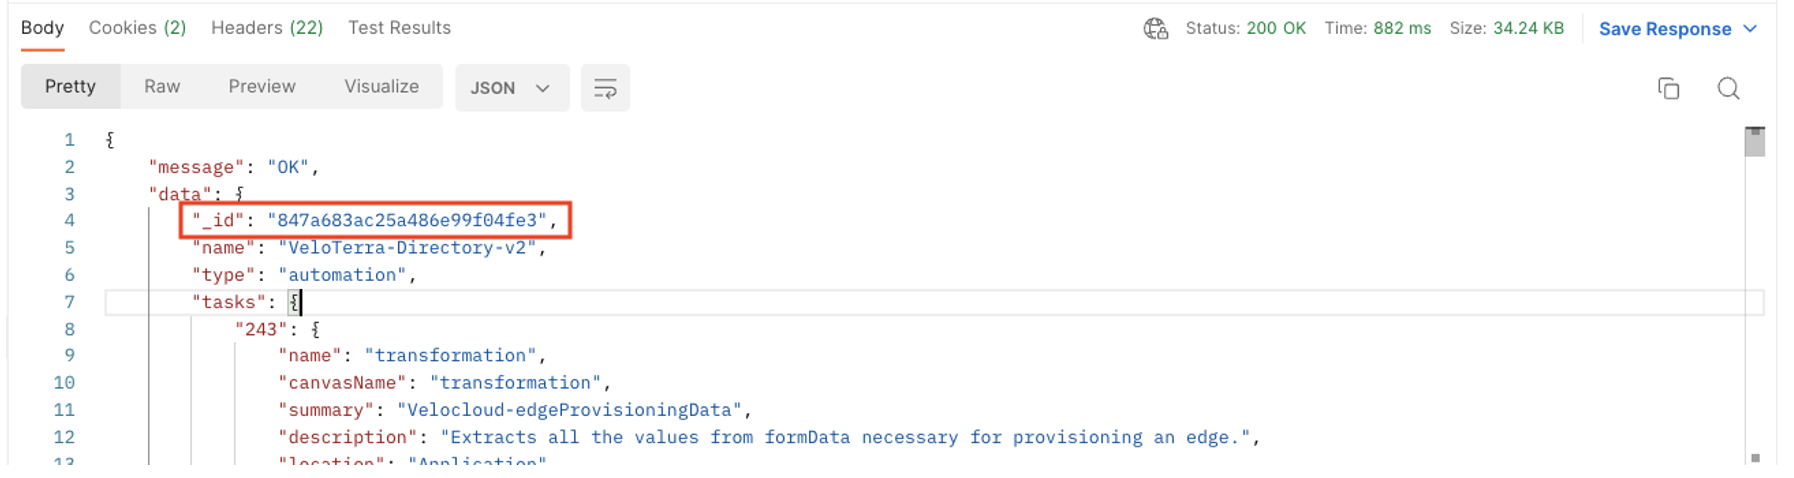
Response body: The job_id value can be found in the response body of the POST call (_id). The following example shows the response and where to find the job_id:
Response status: The response from the GET job status call looks like the following. The "status" field indicates whether the job is still running or complete:
HTTP verbs
Operations Manager API triggers are intended to start an automation job. For this reason, the only HTTP verb supported is POST. HTTP verbs denote the impact a request has on the target resource. Supporting other HTTP verbs, such as DELETE, would imply that an API trigger is being deleted rather than that the trigger is starting an automation whose purpose is to delete configuration from an external service or device.
Additional resource
For more information about API triggers, watch the Itential Learn video below.
Create an event trigger
Event triggers run the automation whenever the configured event occurs. When an event occurs in Itential Platform:
- The event system publishes an event object representing that event as a JSON object.
- The
payloadkey of the event object is validated against the payload schema filter defined in the event trigger. - If the
payloadpasses validation, it is extracted from the event object and sent to an optional JST defined in the event trigger. - After the JST is applied (if relevant), the
payloadis made available to the workflow and the automation runs.
To use keys and values from the payload in a workflow, you must reference them as job variables in the workflow.
For more information, see Event system.
The Create Event Trigger panel includes the following fields:
- Name: Enter or edit the trigger name.
- Description (optional): Enter a brief description of the trigger.
- Type: Select the trigger type.
- Event (required): Select the event that runs the automation.
- JST (optional): Select the JST to transform the event
payload. - Legacy Workflow Compatibility: Makes the trigger compatible with workflows created using legacy versions of Itential Platform (prior to 2023.2).
- Payload Schema Filter: The JSON schema the event
payloadmust conform to. - Save Changes: Save the trigger.
Payload schema filter
The payload schema filter is a JSON schema against which the payload key of an event object is validated. If the payload is valid, the event trigger proceeds to run the automation. If the payload is invalid, the automation does not run.
The payload schema filter uses the following syntax:
It is possible to create an infinite job execution loop if an automation can activate its own event trigger. This is especially applicable when using the following events in an event trigger:
jobStartjobCanceljobError
When using an event trigger, ensure the workflow executed by the automation cannot generate an event that will activate that same event trigger.
Create a manual trigger
Manual triggers run an automation only when you invoke them. A JSON Form may optionally be assigned to the trigger to provide runtime data to the underlying workflow.
The Create Manual Trigger panel includes the following fields:
- Name: Enter or edit the trigger name.
- Description (optional): Enter a brief description of the trigger.
- Type: Select the trigger type.
- Form (optional): Select the JSON Form to use with the assigned workflow. JSON Forms apply to workflow automations. Agent automations don’t use JSON Forms; you provide the agent’s input variables instead.
- Create New Form: Click + to open the Studio create modal in a new tab and create a new JSON Form.
- Wrap form fields into a single formData object: When selected, assigns all form fields to a
formDatajob variable in the workflow context. - Form Data: View and edit the contents of the selected JSON Form.
Run automations from manual triggers
Create a schedule trigger
Schedule triggers run the automation at some point in the future at an optional repeating frequency.
The Start time selected in the Create Trigger panel and shown in the trigger card after saving is based on your current time and date.
The Create Schedule Trigger panel includes the following fields:
- Name: Enter or edit the trigger name.
- Description (optional): Enter a brief description of the trigger.
- Type: Select the trigger type.
- Start (required): Select the date and time to start running the automation.
- Repeat Every (optional): Check the Repeat checkbox and select how often the trigger runs the automation.
- Process Missed Runs (required): Sets whether Operations Manager runs the most recently missed scheduled run if a scheduled item fails to run.
- Form (optional): Select the JSON Form to use with the assigned workflow. JSON Forms apply to workflow automations. Agent automations don’t use JSON Forms; you provide the agent’s input variables instead.
- Legacy Workflow Compatibility: Makes the trigger compatible with workflows created using legacy versions of Itential Platform (prior to 2023.2).
- Form Data: View and edit the contents of the selected JSON Form.
- Save Changes: Save the trigger and any assigned JSON Form data and inputs.
Trigger cards
You can manage triggers for an automation through a collection of trigger cards on the Automation Details page. Each trigger card includes the following elements:
- Triggers Toolbar: Action icons (from left to right) to create a new trigger, run a trigger, or delete triggers.
- Toggle Switch: Enables or disables the trigger.
- Select Trigger: Checkbox to select the trigger.
- Action Icons: Perform operations on the trigger. Available icons vary depending on the trigger type.
Trigger card actions
From a trigger card, you can:
- View information about a trigger (name, type, and description).
- Create a trigger.
- Enable or disable a trigger.
- Run, edit, or delete a trigger.
To enable or disable a trigger, click the toggle switch at the top-right corner of the trigger card:
- When the toggle switch is blue with a check mark (✓), the trigger is enabled.
- When the toggle switch is gray with an X, the trigger is disabled. A disabled trigger does not run its automation.
To run or delete a trigger, click the Run or Delete button at the bottom-right corner of the trigger card.
Triggers can also be deleted in bulk. Check the select box at the bottom-left corner of each trigger you want to delete, then click Delete in the Triggers Toolbar.