Configure RADIUS authentication
The RADIUS adapter allows Itential Platform to interact with a RADIUS server for authentication. Use this procedure to configure RADIUS-based authentication.
Before you begin
The RADIUS server must include a vendor-specific attribute (VSA), typically placed in the dictionary file. The syntax provided in Configure FreeRADIUS files corresponds with this guide and applies to FreeRADIUS. The syntax for other RADIUS servers may differ — refer to your RADIUS server’s documentation for the exact syntax required. You must also ensure users and groups are correctly configured with the Itential-Group VSA attribute.
Install FreeRADIUS
The following steps provide a basic installation process using FreeRADIUS as an example. IPs, usernames, groups, and passwords will vary with your environment. This sample installation was performed on a CentOS 7 virtual machine in a test environment.


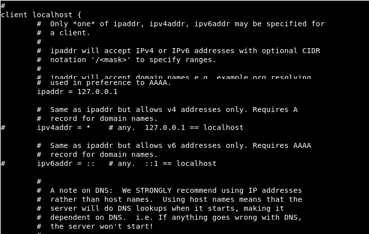
Configure FreeRADIUS files
These instructions are provided as an example — your environment will differ.
A vendor-specific attribute (VSA) is required when using FreeRADIUS. Add the VSA information to the dictionary and users files. The RADIUS configuration file at /usr/lib/firewalld/services/radius.xml will most likely not require changes.
Test FreeRADIUS
Add a RADIUS adapter
Open Admin Essentials
After logging in to Itential Platform, select Admin Essentials in the left navigation menu.
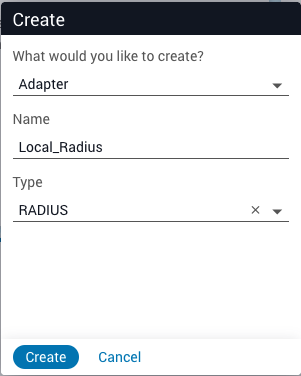
Create a new adapter
Click the plus sign in the top toolbar to create a new adapter. The Create dialog opens. Click the dropdown arrow and select Adapter from the menu list.
Enter adapter information
Enter a name for the adapter (for example, Local_RADIUS) and select the RADIUS adapter type from the dropdown menu.
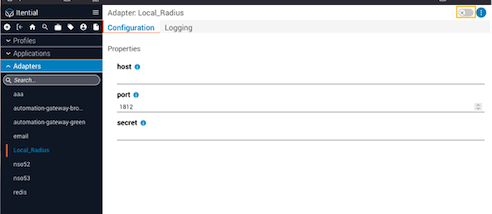
Create the adapter
Click Create. The adapter appears in the Adapters collection menu on the left and the Configuration tab displays automatically.
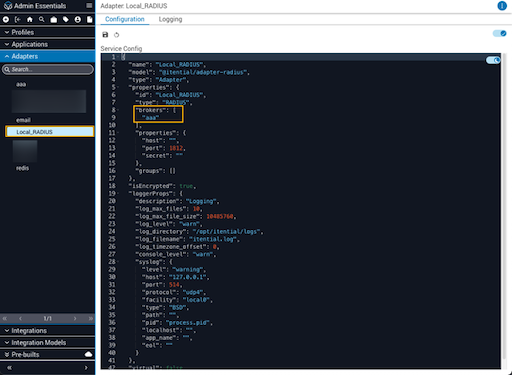
Configure local RADIUS parameters
The configuration below shows the default parameters. You must include the correct groups that will be allowed to access Itential Platform — at a minimum, include the group that will have administrative rights. If a login user and their associated group are not listed, they will not have access to any adapters or apps within Itential Platform.
If you use a name other than Local_Radius, update the "id" property along with the "name" and "group" properties under "radius_groups".
Create a profile for the RADIUS adapter
Clone an existing profile
Select an existing profile (usually profile1) from the Profiles collection in the left navbar. Click the stacked dots icon in the upper-right and select Clone from the menu options.

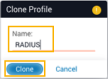
Name the new profile
Enter a name for the new profile (for example, RADIUS) and click Clone. The profile appears in the Profiles collection on the left and the Configure editor displays.
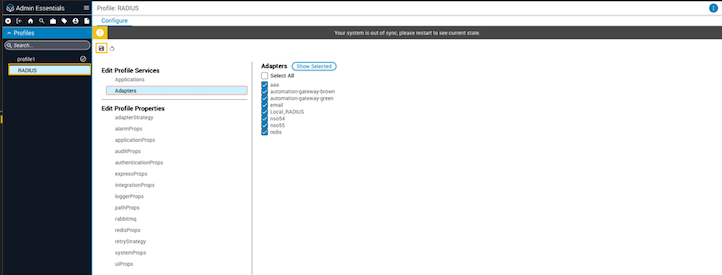
To encrypt the secret under the adapter properties, refer to Password Encryption.
Troubleshoot the RADIUS adapter
If you encounter issues using the RADIUS adapter:
-
If you cannot access Itential Platform using the RADIUS profile, revert to the original profile. From a terminal prompt, use root login to edit
/opt/pronghorn/current/properties.jsonand set the active profile toprofile1: -
Restart the Itential Platform service and attempt to log in again:
-
If problems persist, the issue is usually related to configuration. Check the following:
RADIUS adapter:
- Check the RADIUS hostname and port.
- Check how groups are configured.
- From a server prompt, stop and restart the associated process for the adapter using the
killcommand and the PID for the RADIUS adapter.
RADIUS server:
- Check the whitelist file to ensure the Itential Platform server address is listed. With FreeRADIUS, check
/etc/raddb/clients.conf. - Check the users file to confirm the Itential Platform user is correctly defined with the correct username, password, and group in
/etc/raddb/users. - Verify the VSA is defined correctly in
/etc/raddb/dictionary. - Check firewall and ACL rules.
See the FreeRADIUS documentation for further instructions on installation, configuration, and troubleshooting.