> For clean Markdown of any page, append .md to the page URL.
> For a complete documentation index, see https://docs.itential.com/itential-cloud/configuration-manager/golden-configurations/cli/llms.txt.
> For AI client integration (Claude Code, Cursor, etc.), connect to the MCP server at https://docs.itential.com/_mcp/server.
# CLI Golden Configurations
> Evaluate device configuration compliance with baseline configurations
CLI Golden Configurations evaluate whether the running configuration for a device matches its node's baseline configuration. In this guide, you will learn how to:
* Create a baseline configuration
* Add devices to a Golden Configuration node
* Run compliance checks against those devices
* Use compliance reports to take corrective action against any detected compliance violations
## How CLI Golden Configuration works
Every node in a CLI Golden Configuration has an associated baseline configuration, which consists of:
* Lines of text that mimic the syntax used when configuring a device natively
* Rules that determine how those lines are interpreted (whether the line should be present or absent from the device's running configuration)
Once a device has been added to a node, you can run compliance checks against it. The device's running configuration is compared against the node's baseline configuration, and any discrepancies are noted in the resultant compliance report.
## Configuration tab
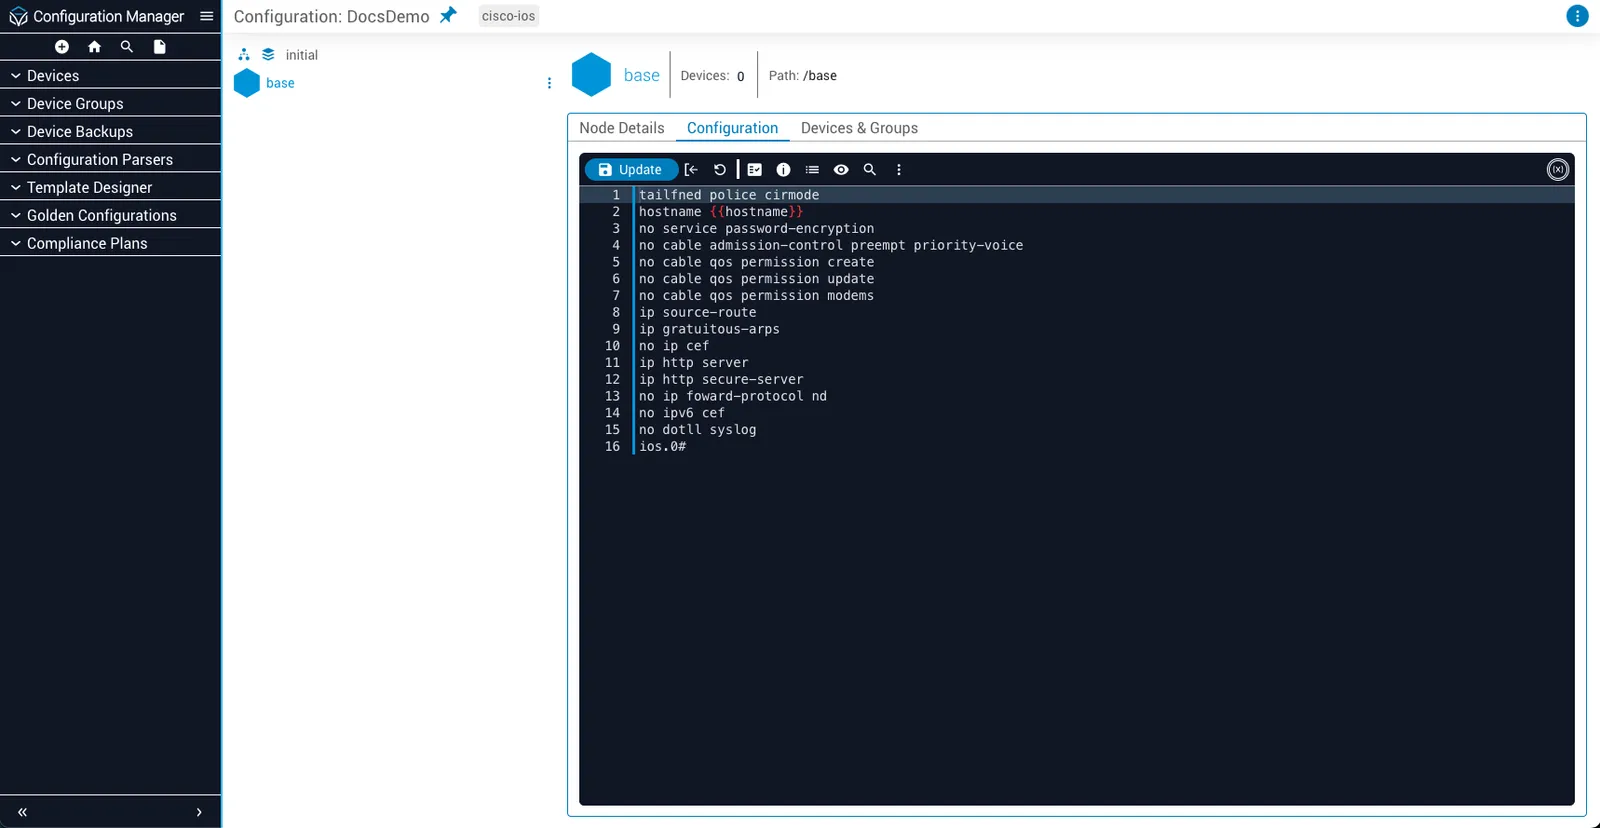
Before devices can be managed on the current node, a baseline configuration for them to be compared against must be defined via the **Configuration** tab. Here, you can:
* Write configuration lines via text editor
* Set the rules that are applied to each line
* Define variables for use in the configuration
### Add configuration lines
To begin writing a configuration, start typing in the text editor as if you were issuing commands on a device's native command-line interface (CLI). Alternatively, you can paste an existing configuration into the text editor from another source, or import it from an available device.
### Import a device configuration
To import a configuration from an available device into your Golden Configuration:
#### Open import modal
Click the **Import** button located on the text editor toolbar. The Import Device Configuration modal will appear.
#### Select device
Find the device that you would like to import a configuration from and click the **+** button located next to it. The device's configuration will be appended to the bottom of the text editor.
### Apply rules to configuration lines
Configuration line behavior is determined by two rules, both assigned on a line-by-line basis:
* Evaluation mode
* Severity type
#### Evaluation mode
Evaluation mode determines how the presence or absence of a line from a device's running configuration is interpreted by compliance checks.
| Mode | Delimiter | Description |
| ---------- | :-------: | --------------------------------------------------------------------------------------- |
| Required | | The default evaluation mode (the line must exist in the device's running configuration) |
| Disallowed | `{d/}` | The line must **not** exist in the device's running configuration |
| Ignored | `{i/}` | The line is to be ignored during compliance checks |
To change a line's evaluation mode, prepend the relevant delimiter to the line, or:
#### Open evaluation menu
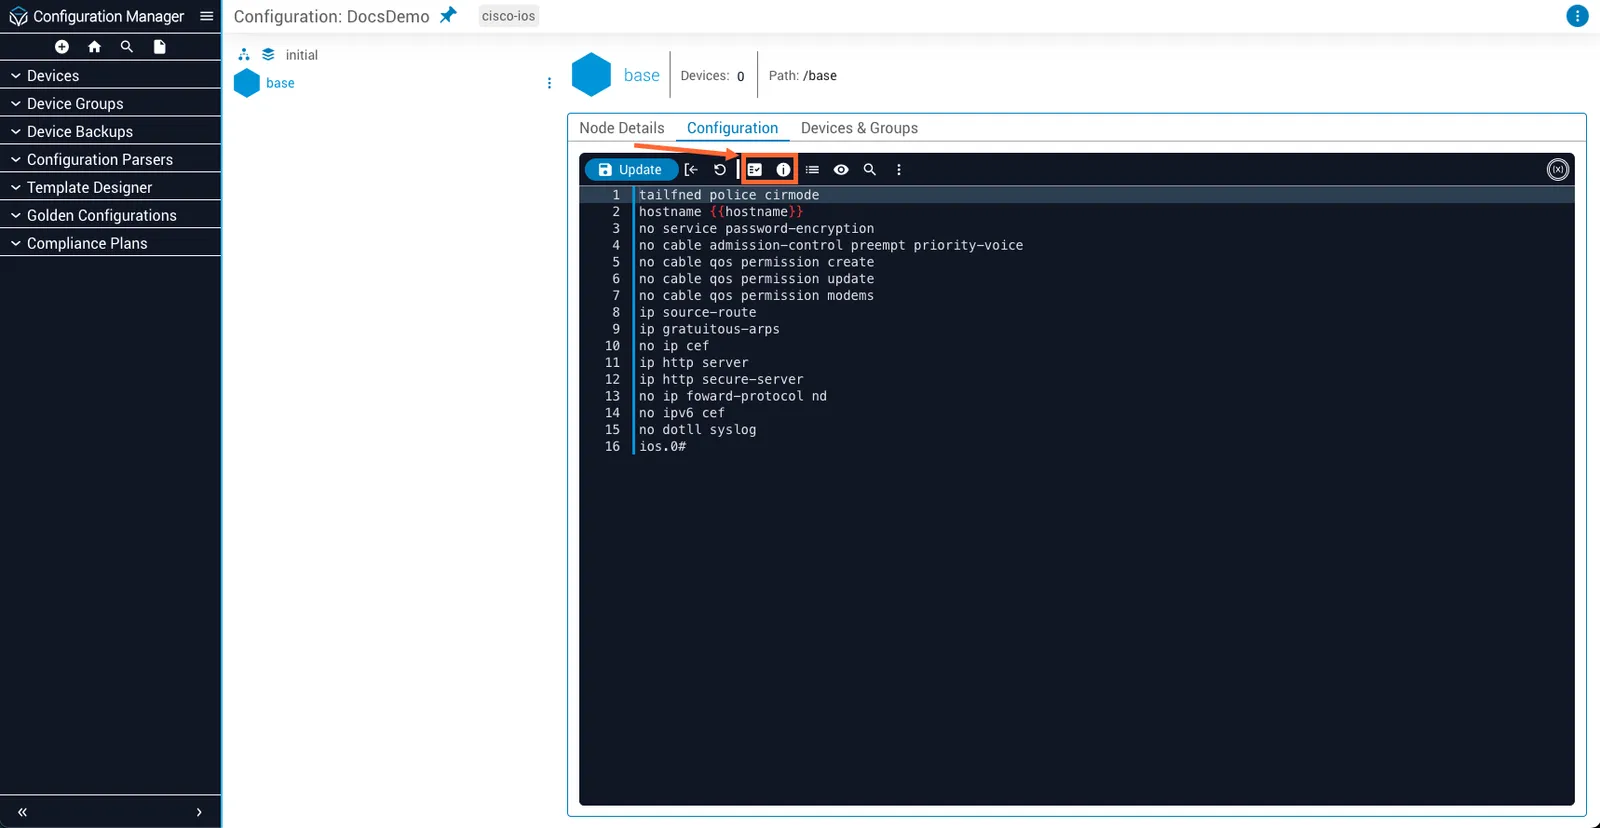
Hover over the **Evaluation** icon located on the text editor toolbar. A menu will appear.
#### Select mode
Select the desired evaluation mode from the menu.
#### Severity type
Each line violation is assigned a severity type that reflects a weight value used when calculating a device's configuration grade. In descending order of severity:
* Warning (default)
* Error (delimited by ``)
* Info (delimited by ``)
These values are useful for approximating the potential impact a line may have on a device's performance if it deviates from the baseline configuration. A line that defines the description field for an interface may be assigned **Info**, while a line that sets that interface's management IP address may be assigned **Warning**.
The steps to change a line's severity type are similar to those used to change its evaluation mode—hover over the **Severity (ℹ)** icon on the toolbar.
### Variable and regular expression support
You can add more flexibility to your configuration by defining variables for values that may be dynamic (hostnames, interface numbers, etc). For example, you may wish to allow your configuration to be updated by other sources, such as workflows. Or you might want to define an IP address used throughout the configuration as a variable so that only one update needs to be made if that address changes in the future.
#### Open variable editor
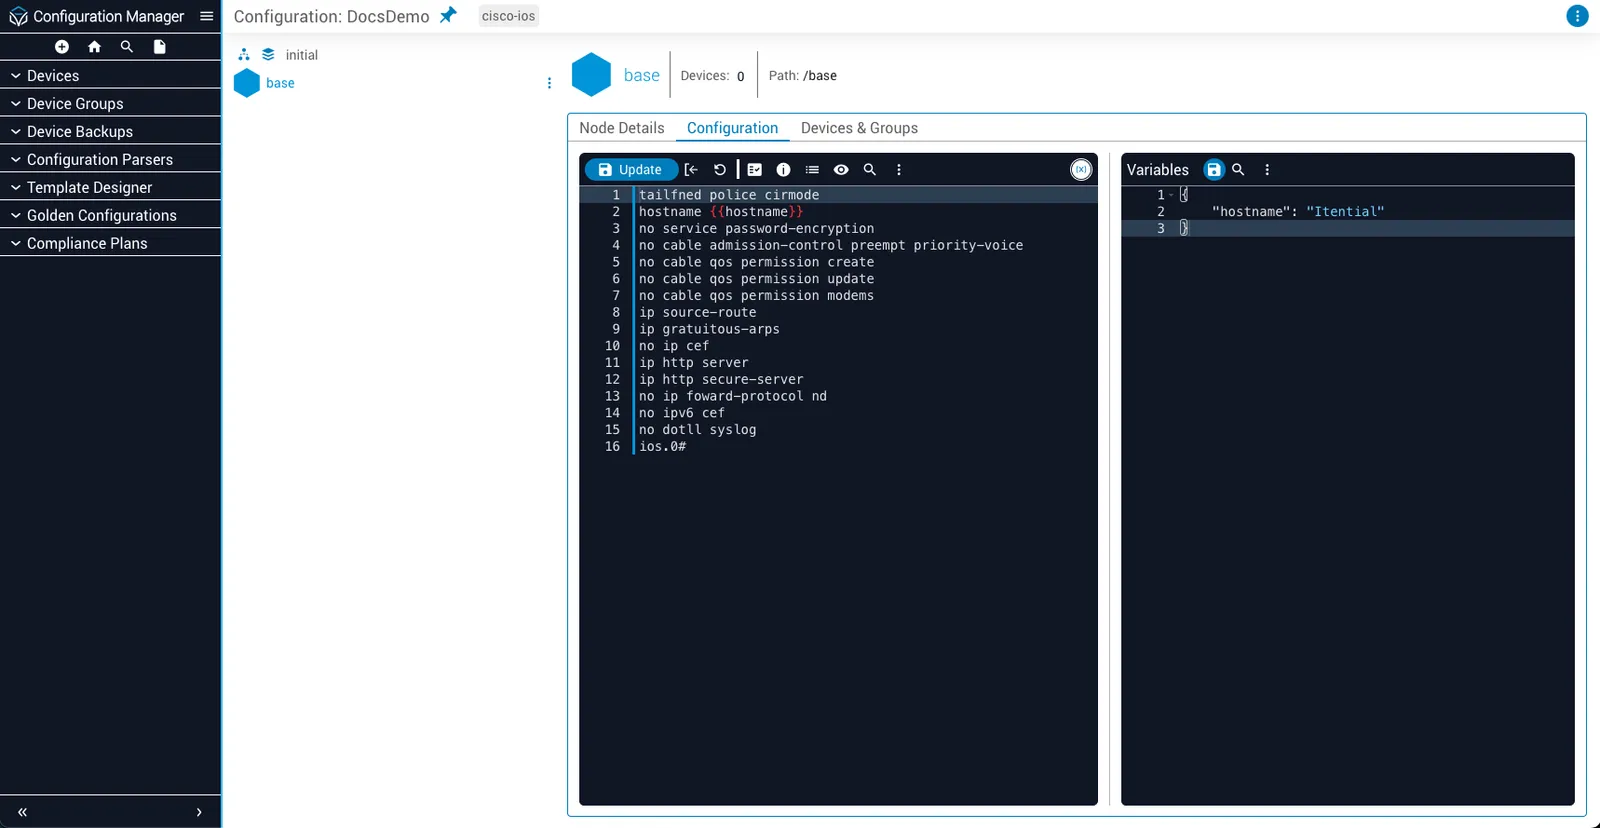
Click the **Show Variables (X)** button located at the upper-right corner of the text editor. The text editor will split vertically, with the variable editor being displayed on the right.
#### Define variables
Using the variable editor, define your variables in JSON format. For example, to define the variable `hostname` with a value of `"Itential"`:
```json
{
"hostname": "Itential"
}
```
#### Save variables
Click the **Save** button located at the upper-right corner of the variable editor.
#### Call a variable
To call a variable in your configuration, enclose its name in the `{{ }}` delimiters:
```
hostname {{hostname}}
```
#### Use regular expressions
Configurations also support regular expressions. To use one, enclose it in the `{/ /}` delimiters:
```
hostname {/[A-Za-z]/}
```
Regular expressions only detect noncompliant lines. Remediating a matched line always adds a new line instead of setting the matched value. For more information, see [Perform remediation](#perform-remediation).
## Devices & Groups tab
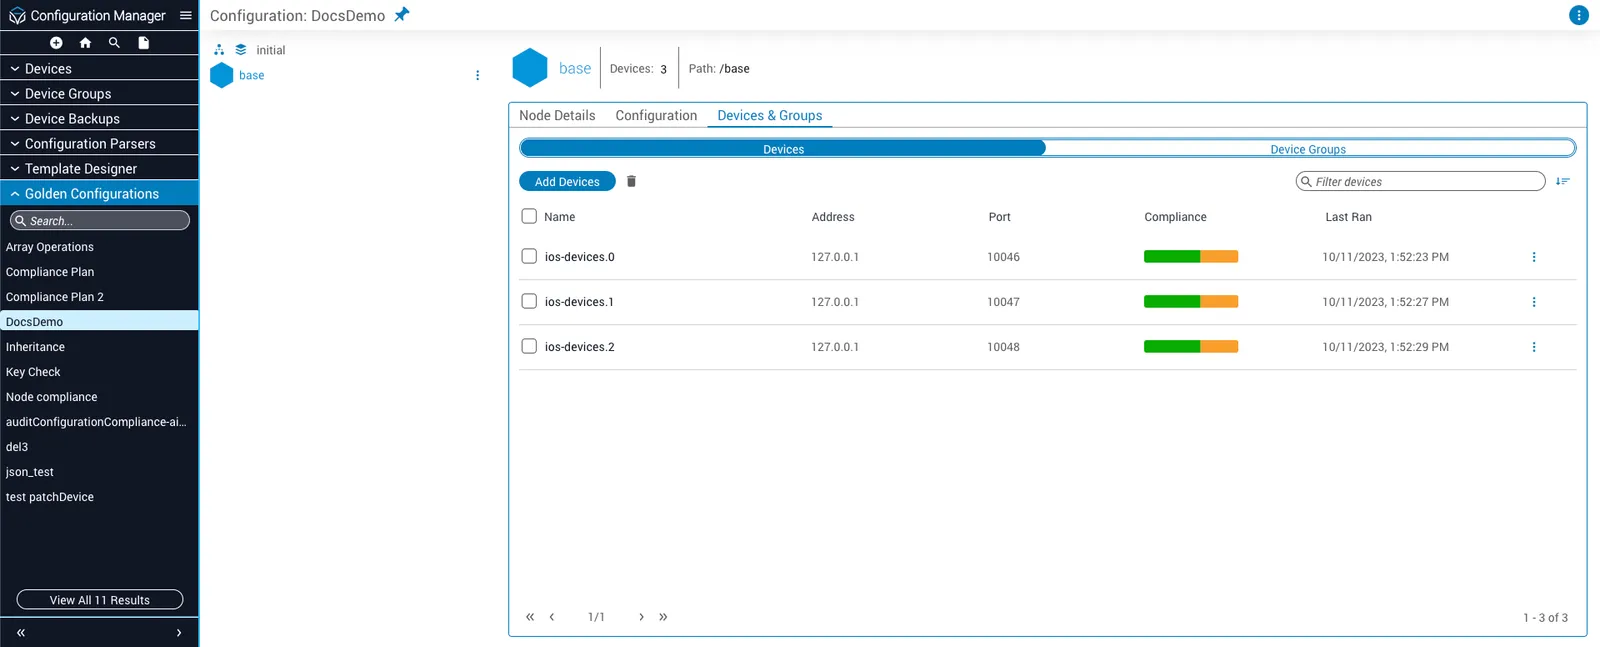
The **Devices & Groups** tab contains all actions related to managing devices and device groups associated with the current node. From this tab, you can:
* Add devices or groups to the node
* Run compliance checks against devices and groups
* Perform basic remediation based on the results of these compliance checks
Devices and groups are each managed under their own respective subtab. Click the subtabs to switch between them.
Prior to Itential Platform version 2023.1, the Devices & Groups tab was known simply as the **Devices** tab. It did not operate on device groups.
### Add devices and device groups
To evaluate whether a device is compliant with your baseline configuration, you must first add it to the node:
#### Open Add modal
Click the **Add Devices** or **Add Device Groups** button located underneath the tab headers. The Add Devices or Add Device Groups modal will open, respectively.
#### Select items
Select which items you would like to add to the node.
#### Add to node
Click the **Add** button located at the bottom of the modal. The modal will close and any selected devices or groups will be added to the node.
All devices and groups associated with the node are displayed in a table view on their respective subtab.
If your Golden Configuration uses a custom [parser](/itential-platform/configuration-manager/golden-configurations/use-parsers) (OS Type) that employs operating system (OS) restrictions, you will only be able to add devices supported by that parser to the Golden Configuration.
### Compliance
Once you have added a device or group to the node, you can run compliance checks against it:
#### Open device menu
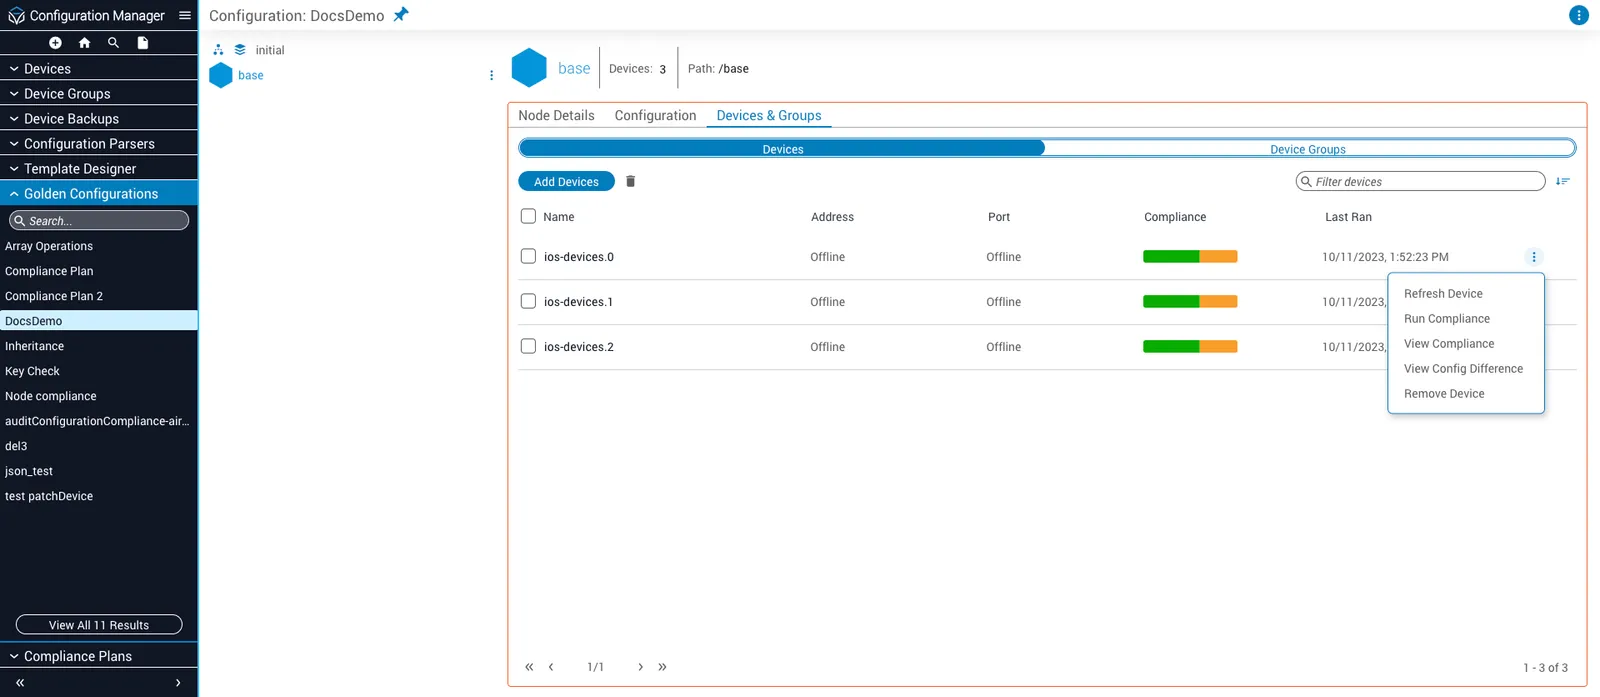
Click the **menu (⋮)** button of the device or group. A menu of actions that can be taken will appear.
#### Run compliance
Select **Run Compliance** from the menu.
After the check is complete, you can view a report that details any detected compliance violations. The steps taken to view the report are similar between devices and groups, but there are slight differences.
#### View compliance report for a device
#### Open device menu
Click the **menu (⋮)** button of the device. A menu of actions that can be taken will appear.
#### View compliance
Select **View Compliance** from the menu. All available compliance reports for the device will be displayed.
#### Select report
Select the compliance report that you would like to view.
#### View compliance report for a device group
To view a compliance report associated with a device group, click the **menu (⋮)** button of the group and select the **Review Group** option. A list of devices will be displayed—from here, follow the instructions given above for viewing device compliance reports.
### Perform remediation
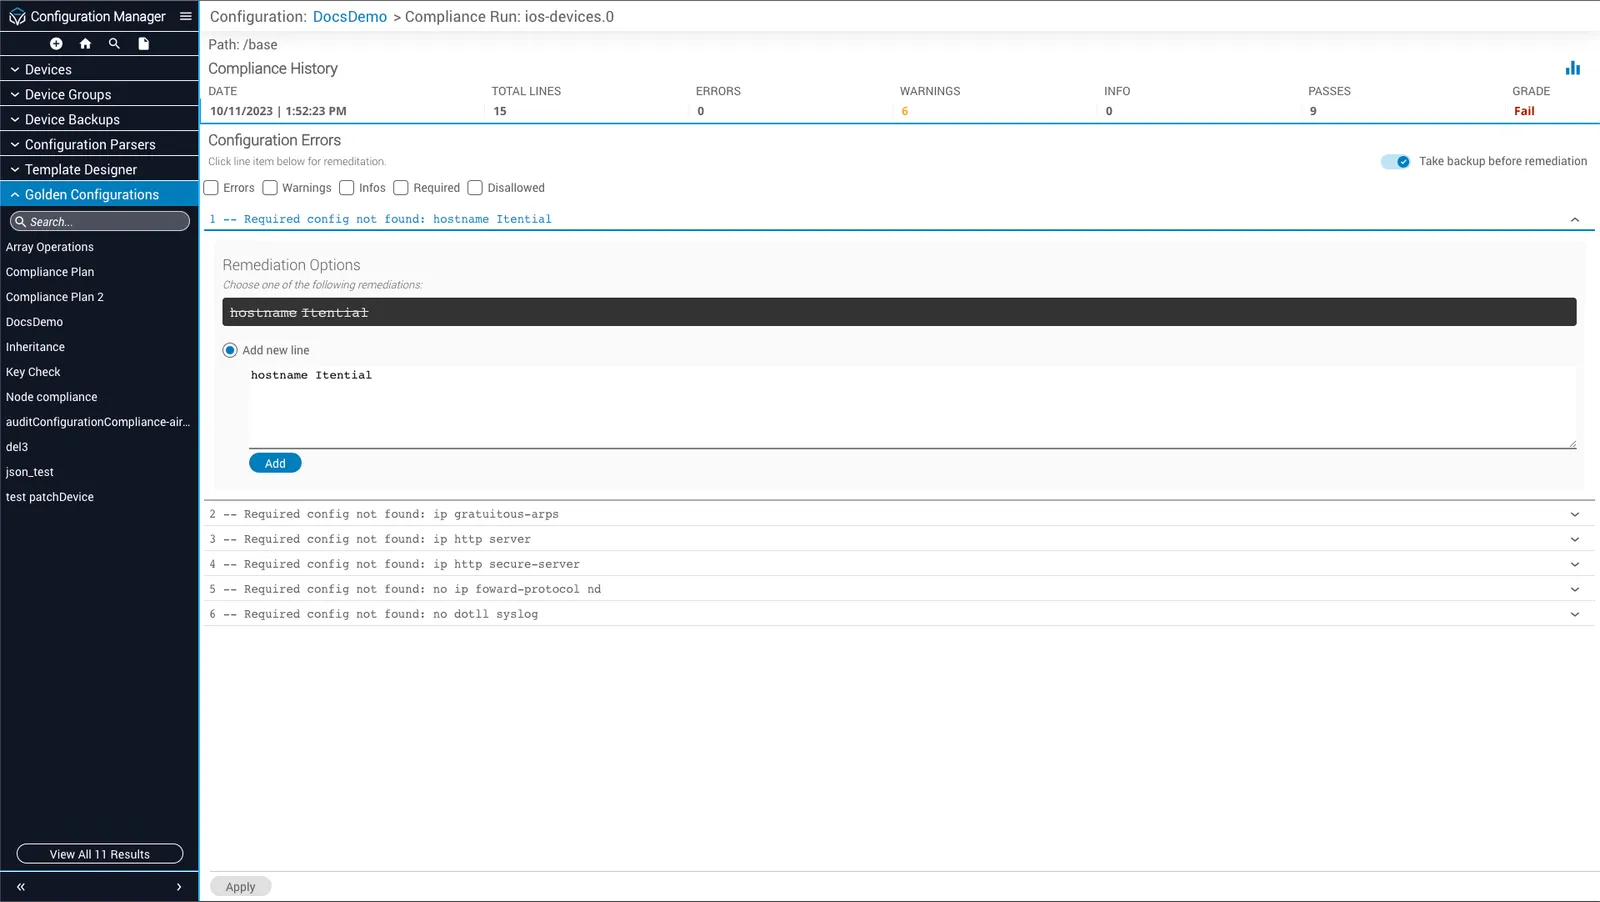
Compliance reports list any violations detected in a device's running configuration beneath the **Configuration Errors** header. To view more details about any item on the list, including potential remediation options, click its dropdown arrow.
To apply one of the suggested remediation options to the device:
#### Select remediation option
Select the option via its radio button. An additional, context-sensitive button will appear to confirm the suggested remediation.
#### Confirm remediation
Click the confirmation button. A check mark will appear to denote that the violation has been marked for remediation.
#### Apply changes
Click the **Apply** button located at the bottom of the compliance report.
You can mark multiple violations for remediation before applying your changes.
By default, a backup of the device's running configuration will be made before any changes are applied. This behavior can be toggled via the **Take backup before remediation** switch.
Remediation always adds the specified line. It never replaces an existing line's value, even for options labeled **Replace**.
This matters for lines that reject duplicates or are hard to deduplicate, such as ACL rules. For example, remediating a noncompliant `permit` line doesn't overwrite the old entry—it adds a new entry with a new sequence number, even though the compliance report marks the remediation successful. The result is a running configuration with duplicate or conflicting ACL entries.
To change an existing line's value:
1. Run a remediation that disallows and removes the old line.
2. Run a second remediation that adds the corrected line.
Removing a line this way can delete more than intended. For example, removing an ACL's `permit` line removes the entire entry, including its `remark` lines.
## Define severity weight and grade benchmark values
The grade a device's running configuration receives (Pass, Review, or Fail) in a compliance report can be influenced by changing:
* The default weight value assigned to each line severity type
* The default benchmark value assigned to each grade
### Calculate the grade of a device configuration
When a compliance report is run against a running configuration, the following formula is used:
```
Score = (totalNumPassLines / ((numOfErrorLines * errorWeightValue) + (numOfWarnLines * warnWeightValue) + (numOfInfoLines * infoWeightValue) + totalNumPassLines)) * 100
```
The following severity type weight values are used in this formula by default:
* Error: 2
* Warning: 1
* Info: 0.5
The score returned by this formula is compared to the following grade benchmark values by default to assign a grade to the running configuration:
* Pass: 90
* Review: 80
* Fail: 0
**Example:** If a configuration that is 10 lines long has one non-compliant line assigned the **error** severity type, it would be scored 81.82:
```
81.82 = ((9 / ((1 * 2) + (0 * 1) + (0 * 0.5) + 9)) * 100)
```
As such, the configuration would be given a grade of **Review**.
### Use a workflow to define custom values
You can use a workflow to run a compliance report with custom severity type weight and grade benchmark values:
#### Add task to workflow
Add the **gradeComplianceReport** task to the workflow.
#### Locate options variable
Locate the **options** variable in the **Task Configuration** modal.
#### Define custom values
Define the custom values in JSON object format.
**Example:** To halve the default severity type weight and grade benchmark values (excluding the Fail grade), provide the following to the **options** variable:
```json
{
"error": 1,
"warning": 0.5,
"info": 0.25,
"pass": 45,
"review": 40,
"fail": 0
}
```
> Evaluate device configuration compliance with baseline configurations